How to Transfer Music from iPad to iPhone without Computer?
Music and movies are the two most common uses for an iPad, and there are a number of great options out there. If you find that you want to use this gadget for both purposes, then you should consider getting an application that will allow you to view pictures and play music as well. You can use it as a media player, so that you don’t need to carry around another device.
You probably have this hobby of transferring music from iPad to your iPhone using your Mac computer every time. However, what if your Mac not working? If you’ve just brought your computer for a Mac repair, you’re probably worrying about transferring music from your iPad to your iPhone without your computer.
An amazing tool for transferring music from iPad to iPhone is Dropbox, regardless of the size of the file, or the type of file, Dropbox helps you to share these files easily and securely too.
What Is Dropbox?
When it comes to cloud technology, Dropbox is one of the most sought-after storage services. This cloud storage service allows you to copy your music, video, audio, or text files to the cloud or the internet and access them later. Using Dropbox, you can pick and select the files you want to save.
What Are the Benefits of Using Dropbox?
The major benefit of Dropbox is its great portability. You don’t have to use an external device to make it work. You can keep all important documents in a single and easy-to-find location. Dropbox can be accessed using other devices aside from office and personal computers, including mobile devices, such as an iPad, iPhone, Blackberry, and Android.
So, how do you transfer your music files from your iPad to your iPhone without your computer using Dropbox?
Below are detailed steps to do this:
Method 1: Steps to Transfer Music from iPad to iPhone without Computer
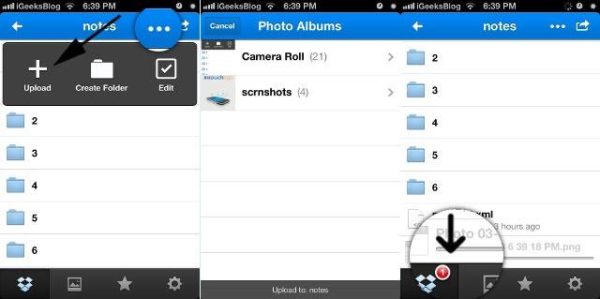
Step 1: Sign into your Dropbox account on your iPad.
Step 2: Upload files using the web interface. (we recommend you set up a folder to save the music in, instead of having it scattered in different folders)

Step 3: After the files have been uploaded, access them via the iOS app on your iPhone.
Note:
- Transferring using these methods is not as fast as on a computer.
- The service might not work sometimes due to weak network signals.
Method 2: How to Transfer Music from iPad to iPhone Using iTunes?
In the event you would prefer to transfer music from your iPad to your iPhone using iTunes, Apple’s official method. Though this method is not as simple as transferring to an Android device, but if you have the right steps, iTunes will do a good work for you. Let’s take you through some easy steps to send your iPad music to your iPhone:
Steps for Transfer Music from iPad to iPhone Using iTunes
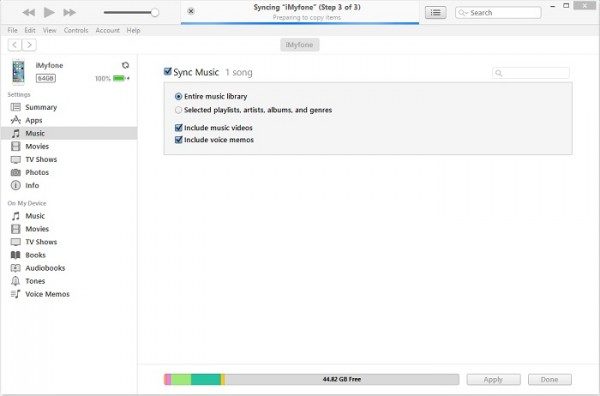
Step 1: Launch the latest version of iTunes your computer and connect your iPad and your iPhone.
Step 2: Click on the phone icon at the top and select the iPad to transfer from it.
Step 3: Different tabs will show in the left side menu, click the Sync button.
Step 4: Select Music, then Entire music library.

Step 5: Once satisfied with your selection, select Apply to finish. Your songs will be successfully transferred.
Method 3: Transfer Music from Windows Media Player to iOS Device with iTunes

Step 1. Navigate to Library > Music, copy music from Music Library to desktop or wherever you can easily find them.
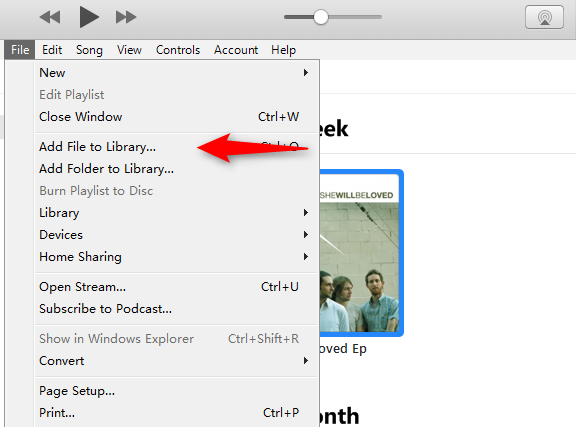
Step 2. Download the latest version of iTunes, Go to Files, click Add File to Library, select the songs then confirm. After all had done, songs on computer are added to iTunes Library.

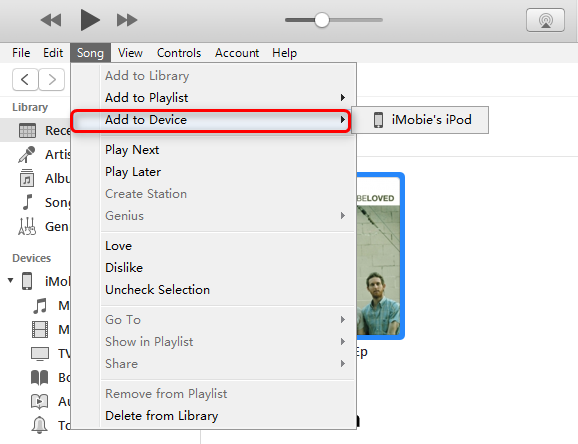
Step 3. Connect your iDevice to computer, select songs you want to transfer to iPhone/iPod/iPad, then click Song and Add to Device.

You may also like
Gihosoft Android data recovery Free is a super awesome software specialized in Android file recovery. With this program, you are able to recover deleted photos, music, videos, messages, contacts, call logs, WhatsApp messages, Viber chat history and more from Samsung, Huawei, LG, HTC, Motorola, Google, Oneplus, Sony, Lenovo, ZTE and other Android devices directly. Meanwhile, this Android data recovery software is available for both Windows and Mac platforms.For now, check:Free iTunes/iPhone Backup Extractor for iPhone, iPad
Jihosoft iTunes Backup Extractor free is a powerful tool to recover and extract important data from iPhone, iPad & iPod touch backup on Windows or Mac.
Conclusion
You have just learned how to use Dropbox as a cool app to use if you want to transfer music files from your iPad to your iPhone. By following the steps above, you’ll never miss the crucial details for a successful transfer, allowing you to fully enjoy listening to the latest hits you want to include in your music library today.
Leave a Comment